Table of Contents
ToggleBathroom cabinets aren’t just boxes to hide toilet paper and cleaning supplies. They define the style, function, and daily flow of one of the hardest-working rooms in the house. Whether planning a full remodel or upgrading a tired vanity, thoughtful cabinet design can make a cramped half-bath feel organized and a spacious master suite feel luxurious. The right choices in style, material, layout, and finish turn chaotic mornings into smooth routines. This guide walks through the key decisions, from frame-and-panel doors to pull-out organizers, so homeowners can design cabinets that work as hard as they look good.
Key Takeaways
- Bathroom cabinet design combines style, functionality, and material selection to transform a hardworking space into an organized retreat that supports daily routines.
- Frameless cabinets maximize usable space in narrow bathrooms, while framed and inset styles offer traditional appeal and durability—choose based on your remodel goals and wall tolerances.
- Prioritize moisture-resistant materials like plywood, moisture-resistant MDF, and sealed finishes to prevent warping, swelling, and water damage in humid bathroom environments.
- Incorporate smart storage solutions such as pull-out shelves, drawer dividers, tall narrow pull-outs, and toe-kick drawers to multiply accessible storage without expanding square footage.
- Proper measurements, stud location verification, leveling, and professional installation (especially for wall-hung cabinets) are non-negotiable to ensure your bathroom cabinet design performs reliably for years.
- Hardware, finish color, and two-tone configurations elevate bathroom cabinet design—select corrosion-resistant materials in finishes that coordinate with faucets and fixtures for a cohesive, functional space.
Understanding Bathroom Cabinet Styles and Configurations
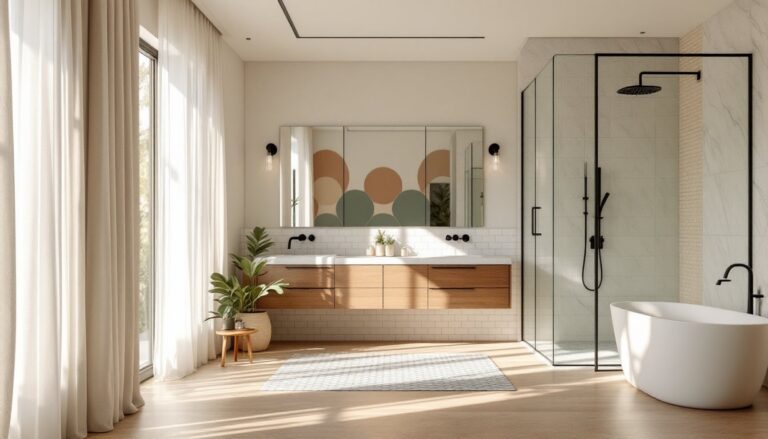
Bathroom cabinets fall into three main style families: framed, frameless (also called full-overlay or European-style), and inset. Each affects both appearance and accessible storage space.
Framed cabinets feature a face frame, a rectangular border of solid wood, attached to the front of the cabinet box. Doors and drawers mount to this frame, leaving a reveal around each opening. This traditional construction is sturdy, hides minor imperfections, and suits classic and transitional designs. The trade-off: the frame slightly reduces the opening size, making it trickier to fit wide pull-out trays.
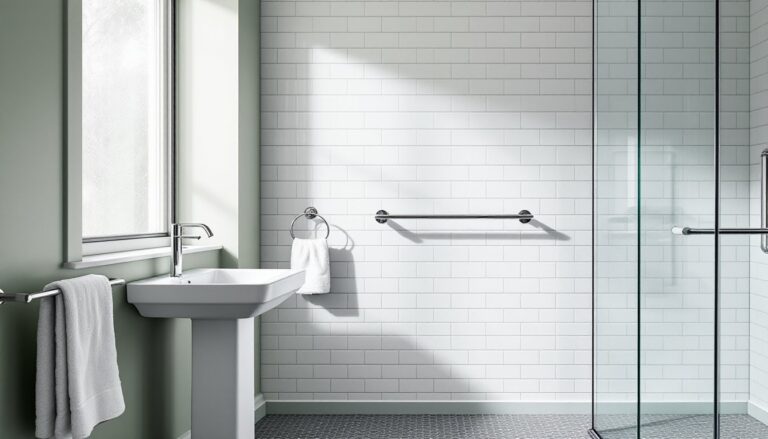
Frameless cabinets skip the face frame entirely. Doors mount directly to the cabinet sides, offering a clean, contemporary look and larger openings. The full-overlay design maximizes usable interior width, helpful in narrow bathrooms where every inch counts. They do require precise installation: without a frame to mask gaps, any twist in the walls shows immediately.
Inset cabinets sit flush within the face frame, creating a furniture-quality appearance favored in high-end and period-authentic remodels. They demand tight tolerances (usually ±1/16″) and cost more, both in materials and skilled labor. They’re beautiful but require a professional carpenter or a very experienced DIYer.
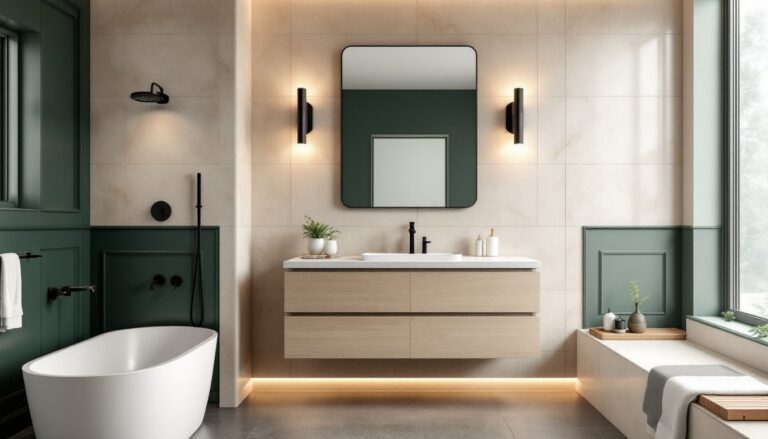
Configuration choices include floor-mounted vanities, wall-hung (floating) vanities, tall linen towers, and medicine cabinets. Wall-hung units free up floor space, simplify cleaning, and suit modern aesthetics, but mounting requires finding studs or adding blocking between studs during framing, not a quick retrofit in finished walls.
Choosing the Right Materials for Bathroom Cabinets
Bathrooms throw heat, humidity, and splashing water at cabinets daily. Material selection determines how well they hold up.
Solid wood, maple, oak, cherry, or poplar, offers durability and traditional appeal. Hardwoods resist dents and accept stain beautifully, but they expand and contract with moisture. In poorly ventilated bathrooms, solid-wood doors can warp or joints can open. Use solid wood for face frames and door frames: consider engineered panels for large door centers to minimize movement.
Plywood cabinet boxes outlast particleboard or MDF in damp environments. Birch plywood is a common choice: strong, stable, and affordable. For boxes, look for ¾” thick plywood: anything thinner flexes under the weight of tile countertops or vessel sinks.
MDF (medium-density fiberboard) takes paint exceptionally well, no grain to telegraph through, and costs less than hardwood. It’s dense and heavy, which helps with a solid feel, but it swells badly if edges aren’t sealed and water seeps in. Use MDF for painted doors and drawer fronts: just ensure all edges get primer and paint, especially around hinge bores.
Moisture-resistant MDF (also called MR-MDF or green-core MDF) includes resin additives that slow water absorption. It’s worth the small upcharge for vanity toe kicks and any component near the tub or shower.
Thermofoil (vinyl film over MDF) and rigid thermofoil (RTF) doors resist moisture and clean easily, but the film can peel if exposed to sustained heat from hair tools or direct sunlight. They’re budget-friendly and come in many colors and faux-wood grains.
Finish all plywood edges with edge banding or solid-wood trim. Seal the interior of cabinets, especially under-sink vanities, with a water-based polyurethane or cabinet sealer to guard against slow leaks and condensation.
Maximizing Storage with Clever Cabinet Layout Ideas
Standard bathroom cabinets waste vertical space with fixed shelves and deep, dark corners. A few tweaks multiply usable storage without adding square footage.
Pull-out shelves (also called roll-out trays) turn base cabinets into accessible drawers. Mount them on full-extension ball-bearing slides rated for at least 75 pounds so they glide smoothly even when loaded with hair appliances and bottles. These slides cost a few dollars more than side-mount or ¾-extension options, but the convenience is worth it.
Drawer dividers and peg organizers keep small items from sliding into a jumble. Spring-loaded dividers adjust without tools: peg systems (like those used in kitchen drawers) let users customize compartment sizes for makeup, razors, and toothbrushes.
Tall, narrow pull-outs beside the vanity (often 6″ to 9″ wide) use filler space that would otherwise go unused. These vertical slots are perfect for storing flat irons, toilet brushes, or cleaning supplies.
Medicine cabinets with adjustable shelves accommodate everything from contact lens cases to tall prescription bottles. Recessed medicine cabinets sit between studs (standard 16″ on-center framing allows for a cabinet roughly 14″ wide), saving wall space. Surface-mount cabinets work when studs don’t align or walls contain plumbing.
Toe-kick drawers under base cabinets capture 3″ to 4″ of otherwise dead space for flat items: scales, bath mats, or kids’ step stools. They require custom fabrication but add surprising capacity.
Consider mixing drawer and door configurations instead of defaulting to all doors. A stack of three drawers offers better visibility and access than a single-door cabinet with shelves, especially for items used daily. Many homeowners find that modern bathroom fixtures inspire them to rethink cabinet layouts entirely.
Vanity Cabinet Design: Form Meets Function
Vanity cabinets anchor the bathroom’s look and house the most frequently accessed items. The single-sink vanity (typically 24″ to 48″ wide) suits powder rooms and small baths. The double-sink vanity (60″ to 84″ wide) demands at least 6 feet of wall and sufficient room to stand comfortably in front of each sink (minimum 30″ of clear floor space per user per IRC R307.1).
Vessel sinks (bowls that sit atop the counter) look striking but eat into drawer depth if the vanity wasn’t designed for them. Standard drawer boxes run 22″ deep: with a 6″ vessel bowl protruding into that space, users may need to reduce drawer depth or switch to pull-outs below the sink.
Undermount sinks free up counter space and pair well with frameless cabinets for a streamlined look. Ensure the countertop material, quartz, granite, or solid-surface, can support an undermount without delamination in humid conditions.
Open shelving under a floating vanity creates an airy feel and provides a spot for decorative baskets or rolled towels. It’s not for everyone, items stay visible, dust accumulates, but it works well in guest baths or minimalist designs where clutter stays minimal.
Color, Finish, and Hardware Selections That Elevate Your Design
Cabinet color and finish set the room’s mood. White and off-white cabinets brighten small bathrooms and pair with any tile or countertop. They show dust and water spots more readily, so plan on frequent wipe-downs. Painted finishes in grays, navies, or greens add personality: just choose a semi-gloss or satin sheen that repels moisture and cleans easily. Flat or matte paints look sophisticated but mark and scuff more.
Stained wood brings warmth. Lighter stains (honey, natural oak) suit farmhouse and Scandinavian styles: darker stains (espresso, walnut) anchor transitional and traditional spaces. Apply a water-based polyurethane topcoat in satin or semi-gloss for durability. Oil-based poly ambers over time, which can shift the color of lighter woods.
Two-tone cabinetry, such as white uppers and navy lowers, or natural wood drawers with painted doors, adds visual interest without overwhelming the space. Keep the transition line clean: align it with the countertop edge or a horizontal tile joint.
Hardware (knobs, pulls, backplates) might seem minor, but it’s one of the first things hands touch. Solid brass, stainless steel, and zinc alloy resist corrosion in humid bathrooms. Cheaper plated steel hardware can rust where the plating chips. Match finish to faucets and light fixtures for a cohesive look: brushed nickel, matte black, oil-rubbed bronze, or polished chrome.
Pull length matters for usability. A 3″ to 4″ center-to-center pull fits most drawer fronts: wider drawers (18″+) look balanced with 5″ or longer pulls. Install pulls horizontally on drawers and vertically on doors for intuitive use. Mount them 2½” to 3″ from the bottom edge of upper doors and the top edge of lower doors so they’re easy to reach.
Design platforms like Houzz and Homify offer thousands of real-world bathroom photos that show how hardware and finish choices play out in actual installs.
Planning Your Bathroom Cabinet Project: Measurements and Installation Tips
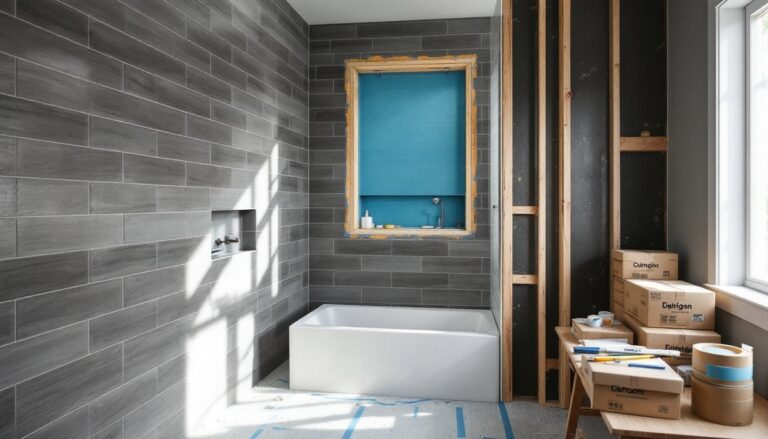
Measure twice, cut once, and in bathrooms, measure three times. Start by recording the room’s length, width, and ceiling height. Note door swing direction, window locations, electrical outlets, and plumbing stub-outs. Sketch a top-down floor plan on graph paper (¼” = 1′ scale works well).
For vanity height, standard is 32″ to 36″ to the top of the countertop. Taller users often prefer 36″ (“comfort height”), which matches kitchen counter standards. If installing a vessel sink, account for the bowl height so the rim doesn’t end up at an awkward 40″.
Depth for vanities typically runs 21″ (including a 1″ countertop overhang). In tight spaces, 18″ shallow-depth vanities exist, but they limit sink size and storage. Wall-hung cabinets (medicine cabinets, linen towers) are usually 4″ to 6″ deep for recessed units, 8″ to 12″ for surface-mount.
Stud location is critical for wall-hung cabinets. Use a stud finder to mark 16″ on-center framing. If the cabinet doesn’t align with studs, install a ledger board (a 1×4 or 1×6 screwed into studs) along the back wall before hanging the cabinet. Drive 3″ cabinet screws (not drywall screws) through the cabinet back into studs or ledger. A heavy vanity top or full linen tower can weigh 150+ pounds: drywall anchors alone won’t cut it.
Leveling is non-negotiable. Set a 48″ spirit level or laser level on the cabinet top. Shim base cabinets at the floor with composite shims (wood shims can compress over time). Once level front-to-back and side-to-side, screw through the back rail into wall studs and shim the gap if needed.
If replacing an existing vanity, shut off water supply at the angle stops under the sink. Disconnect P-trap and supply lines. Check the condition of shut-off valves: if they’re corroded or more than 15 years old, replace them while the vanity’s out. This is also the time to inspect for leaks or mold on the subfloor.
Permits generally aren’t required for cabinet replacement if you’re not moving plumbing or electrical. If adding new outlets (the NEC requires GFCI protection in bathrooms), hire a licensed electrician or pull a permit if doing it yourself. Consult local building department requirements before starting any work that touches wiring, gas, or drain lines.
For painted cabinets, apply bonding primer (such as an acrylic or shellac-based product) before topcoat, especially over glossy factory finishes or previously stained wood. Sand between coats with 220-grit paper, wipe with a tack cloth, and allow full cure time (often 7 days) before heavy use. Rushing finish work shows.
Conclusion
Bathroom cabinet design blends aesthetics, materials science, and smart space planning. Whether building custom units or upgrading stock vanities, attention to moisture-resistant materials, precise measurements, and user-friendly storage transforms a utilitarian room into a well-organized retreat. Take time in the planning phase, invest in quality hardware and finishes, and don’t skip the level. The result: cabinets that look sharp and function flawlessly for years.